Pages

Saturday, January 12, 2013

Always and Forever

Well it is my turn to post about what I did with the "Always and Forever" panel. I have two versions.
I didn't like the first with the points so I took it apart and made the second one. Humm!!!!!!! Not sure about either one. What do you think? You should also go check out what Barb of Bejeweled quilts has done with her panel.

Friday, January 11, 2013

Riley Blake has some cute Valentine Fabric called Sweetcakes and they have the cutest free patterns. Just click on the name and it should take you to the free pattern. I do have some 10" Stackers available for Sweetcakes.
SWEET HEARTS
BE MINE


Wednesday, January 9, 2013

NEW VALENTINE'S PANEL!!

Okay, so I am back again with an idea or two for the NEW Panel we have in the store. The panel from Moda is called Always and Forever by Deb Strain.
 
Mom (Jeanette) sent me one, and when I opened the package of fabric, I had an idea of how I could use it. I am going to make 2 pillows out of the little hearts and 2 wall hanging out of bigger blocks. Here is the pillow final result. It took me longer than I thought this afternoon...my helper was more help than I could handle.
Here is what I did to make the two pillows. I cut the panel as follows:
I put the two bigger blocks aside for later....wall hangings still to come!! Then I grabbed a fat quarter (mine was purple.) and cut 8-2" x13" strips. I also cut out the little heart blocks to be 9"square. I centered the strips on each side and sewed them to the block.
Next, I mitered the corners by ironing a crease and sewing down the fold.

The resulting block is 12". Next I cut batting and muslin to about 14" square and made my sandwich for quilting. Then you quilt as desired... Here is my quilted final results.
 
  Next, I cut out four 81/2" x 12" squares out of muslin(backing color of your choice, I just used muslin). I hemmed one side on each to get four 8"x 12" rectangles. I than layered them over my sandwich top (right sides together) and sewed around all the sides. ( The layered picture isn't very visible with the muslin, but hopefully you get the idea.)
I then trimmed my edges and turned it right side out to make a pillow cover. 
Next, I put in my 12" pillow forms and voila....you have two pillows.
Next, I plan to tackle the wall hangings. I'll post them when I get them done. But for now hopefully this will get your creative juices flowing. So stop on by the store and pick up a panel or two for your Valentine's Decorating!!!

Bev
PS. Don't you just love all the little feet and hands in the picture. Helpers and future quilters.;)

Tuesday, January 8, 2013

RUFFLES (PLEATS) AS PROMISED!

Me, Barb of Bejewels) again today…running on slow mode today.  Here is the finished product.
I wanted pink or blue pleats but didn’t have the fabric and didn’t want to go purchase some.

IMG_1536
First before you even begin, you cut your backing  and batting down to the same size as your front.
IMG_1523

I cut four  4” strips from selvage to selvage.  For me, it is better to have more than not enough.  Nothing is more frustrating to be in the middle of a project and need more.
IMG_1524IMG_1525Then I fold it in half and iron.
IMG_1526
Now, you get your trusty glue stick.  It is the same as “wipe on, wipe off”, you will swipe your glue underneath the ruffle, then you will put some where you want your pleat to go.  I chose to have mine a little further apart than I normally do.  You decide how far apart you want them.  You can even measure.  I am a perfectionist want a be but…tooooo lazy to measure.  So….you just keep repeating this process, swipe under, swipe over (only where you want your pleat to go)…..then iron it down.  You can actually do several before you iron it down.

IMG_1527 IMG_1528IMG_1529
Now for the ends.  Before you even start you will take the end piece, swipe glue on the wrong side of fabric and then fold from the top to the glue, you are just making a little hem. 
When you get to the end, you will cut off any remaining fabric, and do the same thing and then you will place the the end piece over the beginning (I did it wrong here, I placed the end under the beginning piece).  I just think that it goes with the pleats if the beginning if over the end when you flip it right side up.

IMG_1530This is what it looks like

IMG_1531Take a small seam around the outside before you sandwich your piece.

IMG_1532Now sandwich with the batting on the outside and the backing facing the top of your topper and pin.  This is one of the rare moments that I pin.  Then sew.

IMG_1533Clip your edges.
IMG_1534.  .I cut into the back of the batting and the backing.  Not much, just enough to slip the topper through to the right side.  If you don’t want to do this, just leave an opening and sew it down by hand.
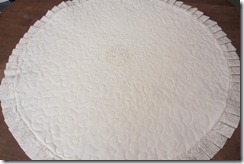
IMG_1537Here is what the back looks like, I used some of the ruffle fabric and made a square with steam a seam or glue.   When I blanket stitched around the middle on the front I just trimmed it to the edges of the blanket stitch and there you have it.  I put the steam a seam under the backing hole and ironed it down, then glued the square over it.

Monday, January 7, 2013

TWELVE MINUTE TOPPER

This is Barb here from Bejewels..... Hope all of you are having a fantastic day. I am here to show you how you can make a round topper (top only) in just twelve minutes.

First you have to chose you a fabric that has a repeating design as shown below:  This is Sanctuary Blue Border print found at Inchworm Fabrics , sold in half yard increments, you need one yard at 2.50 a half yard and with the 25% off...it is even cheaper.

Okay, back to the fabric.

Then you need the pattern, which I might add, you will receive free if you purchase the fabric above. You will cut out eight of these

Then you mark the pattern where the repeat is. As you can see, I did not do this topper this way, found it was better to have the bottom with the repeat or I would not have enough fabric.  Once I get the first triangle done, I use that one as my pattern for the rest.  Jeanette used the 45 degree angle to make hers, so if you have one, you are set.
Sew them together by twos.
Then sew two together to make four. I thought I took a picture of how I ironed it, but ooops.... So I just opened the seam that sewed the two strips together, the other two seams just folded over.
Then sew the two halves together. I ironed that seam open. Most people like to iron all the seams open but I did not, only the seams I mentioned above. Twelve minutes to do this process. I was going to finish it for you but....I want to add a ruffle to this one and need to find the fabric to do so. Tomorrow I will return with adding the ruffle. But....if you do not want a ruffle, just add the batting, backing, top ,quilt as desired and then bind. You are done.

 You will have a nice gift for someone really quick and really cheap. I am putting muslin on the back so as not to waste the expensive fabric. Also, if you are not happy with how the middle turns out....not to worry, you can always put a star, circle, butterfly, or something in the middle. I am satisfied with this so I am going to leave as it.

Sunday, January 6, 2013

Carpenter's Star Jean Quilts


First things first- I was asked about the stars and snowflakes that we made at Christmas time- no sorry no pattern to refer you to. This is what we did. We covered 1" Styrofoam balls with glitter and let it dry. We use floral pins and glass beads. We made 8 to 10 pins with different beads and then hot glued them to the balls and then tied some type of string to hang. For the paper stars we had 8 square pieces of paper and folded them in half and divided the star evenly and cut (I think it was an L) then unfolded and glued with hot glue alternating directions, then glued the 8 pieces together-- my niece showed us how to make these- they made them in school. I'm thinking I can find a pattern for that one. I will look and get back to you.


Now on to the Carpenter's Star. I love stars a lot and I have wanted to make a Jean/khaki's quilt using a carpenter's star for some time. My reasoning this time--- a gift (the same- one of these days I will keep something) My neighbors son got married. It look me about two weeks at night to make two quilts. The hardest part was cutting the jeans. I used 12 pairs of Jeans and 8 different colors of khaki's but I only used one leg on each of the khaki's so I can still make more. I also cut some of the husband's old shirts. It was fun.

So here is what I have.. What do you think??? I love them and who doesn't need a Jean quilt for the football game or a picnic or camping?? I have to admit- one still needs binding- but it is tied and the binding is cut out... I just have no deadline yet for that one and thus it is not done.


See our new addition-- the best Christmas present of all times-- a cat.


Don't you just love them?


Tuesday, January 1, 2013

Giveaway Winner


Karen O at Quilting, Losing, and Tea has won the giveaway for the Sanctuary Fabric. Thanks for entering Karen and thank you to all the rest of you who entered and left comments.


Can you believe it is 2013? It doesn't seem like it should be but it is. I don't know where 2012 went. A new year and a fresh start on all the good intentions I have. I would like to make more quilts for my family. I would like to improve my machine quilting skills. I would like be a better grandmother. I would like to be a better accountant. I would like to be a better wife. I would like a cleaner house. I would like a prettier yard.  I would like to have more energy so that I can be super woman. Thats what it will take to make all those improvements. HA, I am dreaming, well I guess if I am going to dream I might as well dream big.

Hope you have a great New Year and you reach your goals.